In previous posts we have talked about how LLMs are changing the way we perform tasks and how they can help us in all kinds of tasks.
We have seen how these generic models can be given context so that they give a more adjusted and current answer than they would give with just their training. We have also seen that they can interact with each other and use external tools to complete their tasks.
But is this complex to implement? Like everything in this life, it depends on the context, the scale and the use case. The good news is that there are tools that help us incorporate all these practices to help us automate and control tasks. In this text we are going to be a bit more practical than theoretical and we are going to look at one of these tools: n8n.
Before going more in depth, what is n8n?
n8n is a solution that makes automation with AI not a luxury available to few, it is an open-source, no-code/low-code workflow automation platform that allows companies to optimize processes, integrate systems and of course, increase efficiency. It has an intuitive and very powerful visual interface that can be connected to a multitude of applications through API’s. The best part? that we can also use AI capabilities along the workflow through mechanisms discussed in previous posts such as LangChain among others.
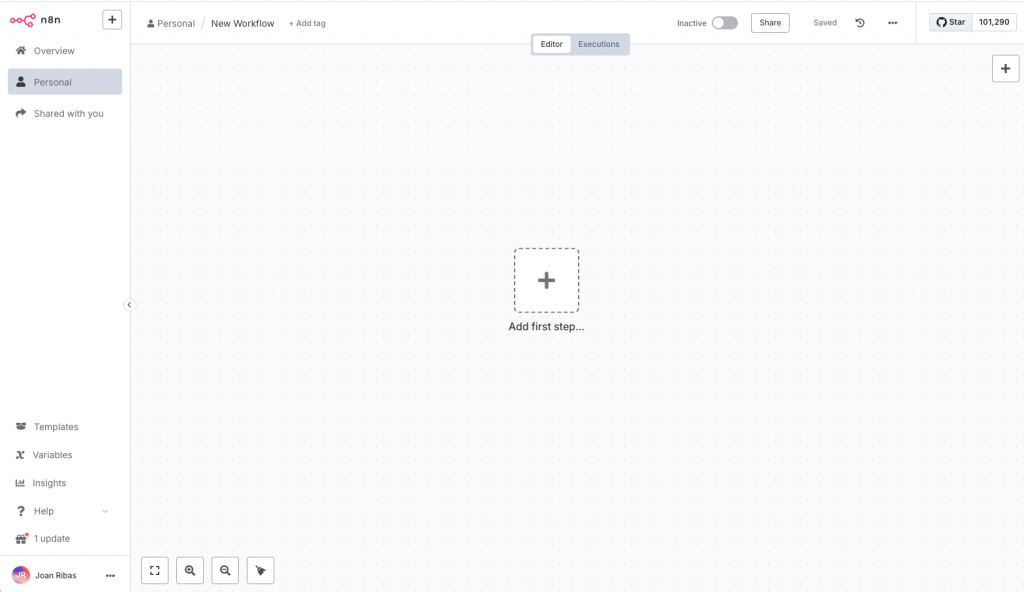
Perhaps one of the best ways to see its potential is to implement a small use case, but first of all, let’s see how we can have n8n available to work with it.
Installation
As mentioned above, n8n is an open source software. We can work with it using the free community version or the paid enterprise version. In this case we will work with the free version. In the same way, we can choose to work with n8n in different ways:
- In a cloud provider that maintains it for us (no installation)
- Self hosted
- Embedded in our own developments
For the example we have used a self hosted implementation in Docker, but the example itself is equally valid for the other options.
The first thing to do is to have Docker installed in our computer.
Once we have Docker running, we can create a volume to store data and download and start the container with n8n:
docker volume create n8n_data

docker run -it --rm --name n8n -p 5678:5678 -v n8n_data:/home/node/.n8n docker.n8n.io/n8nio/n8n
After a few moments, we will be able to access the n8n working environment at the url http://localhost:5678.
Use case
To illustrate a little better the capabilities that n8n can offer us, let’s implement a use case.
Context: We are a very active person in social networks who works in a technology company and we want to write on LinkedIn about current topics.
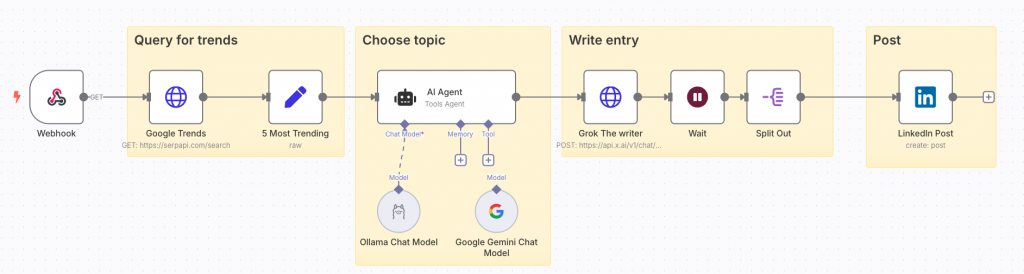
Implementation summary: As we never know when the muse appears, we are going to have a mobile app where we write a topic and send it to n8n. The n8n flow will be in charge of seeing what trends there are about that particular topic, looking for information in Google. Once the trends are known, it will determine which one is the best to write about and will write a post about it. The post will be published directly on LinkedIn.
Implementation
In this case we are not going to see how the mobile application would be implemented, but we will focus on the workflow directly. The first thing we must do is to provide a webhook to call from the mobile application. This webhook will be the trigger for the whole workflow. In this call we will send the topic on which we want to get information from google and that will be linked to the topic on which we will write the post.
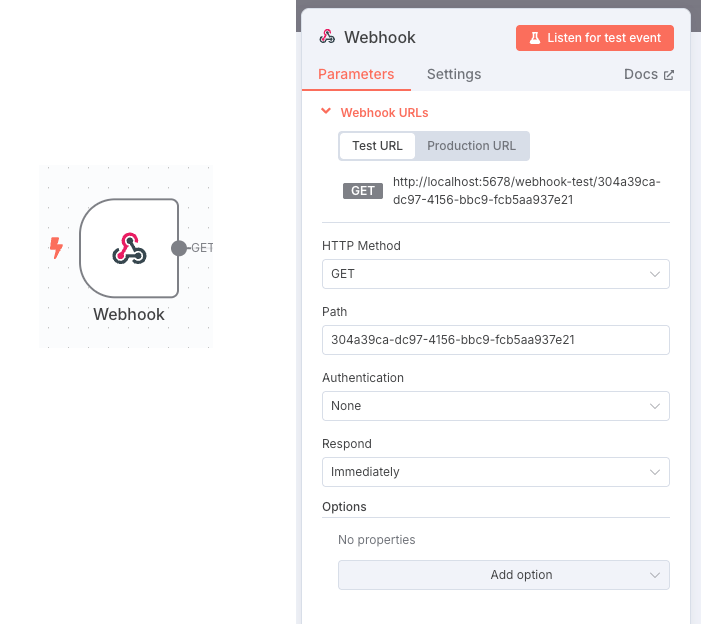
As we can see, the element defines the url to which we should send the topic to search. Now we should only pass as a parameter this topic, for example in this case we want to know about artificial intelligence, so the call would be: http://localhost:5678/webhook-test/304a39ca-dc97-4156-bbc9-fcb5aa937e21?q=artificial%20Intelligence
We can test it directly from the browser. One of the facilities that n8n gives us is that it allows us to test each step of the workflow independently and to see the result of its execution.
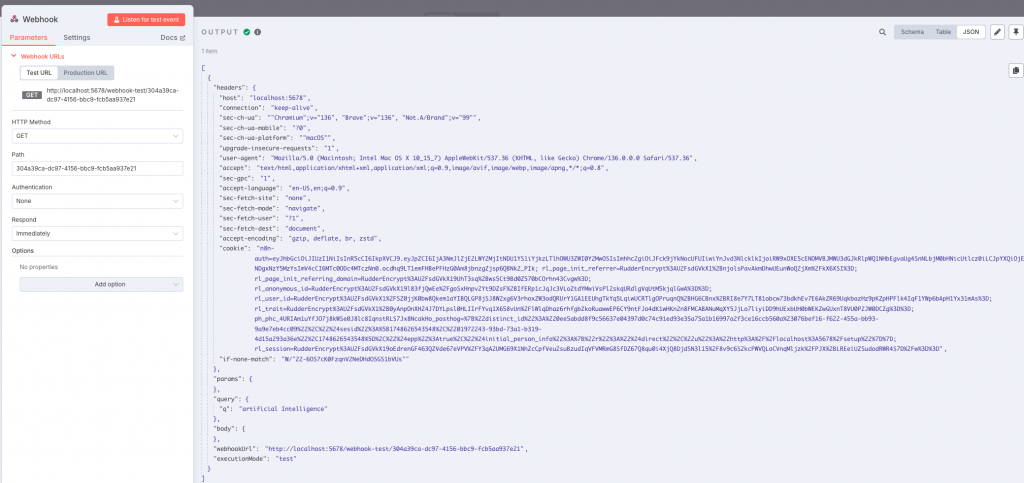
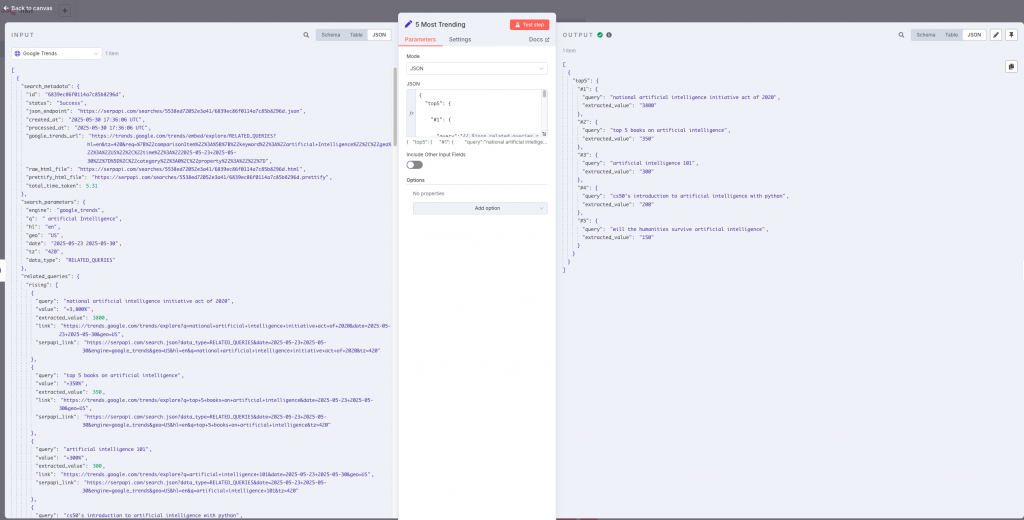
Once the workflow receives the request for the topic to analyze, we will call the Google API to know which questions are trending in the last week about that topic. To do this we need to call https://serpapi.com/search with the corresponding parameters. One of the parameters we need is the topic to search for, which we retrieve from the previous step using “ {{ $json.query.q }}”.

By executing this step we will obtain the most relevant searches with respect to the topic that we have provided as parameter, both the most searched and those that have suffered the greatest increase in searches in the last week.
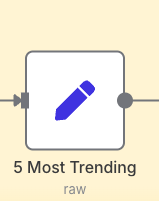
From the obtained answer, we will filter to keep the 5 most relevant ones.
{
  "top5": {

    "#1": {

      "query":"{{ $json.related_queries.rising[0].query }}",
      "extracted_value":"{{ $json.related_queries.rising[0].extracted_value }}"

    },


    "#2": {

      "query":"{{ $json.related_queries.rising[1].query }}",
      "extracted_value":"{{ $json.related_queries.rising[1].extracted_value }}"

    },

....
  }
}
From the 5 most relevant searches, we are going to let an LLM model choose for us the one that best fits the topics we normally deal with. For this we add an AI agent to facilitate this work. In this type of step, we can define the model we want to use, whether we want it to keep memory of previous executions (indispensable in chats) and even the tools that can help in the context. In our case we will only use the LLM model.

In the example you can see two different models, one based on a Google service using Gemini and the other using a local model using Deepseek (or any other model) through Ollama. With this I want to emphasize that if we do not want to use external models (such as Gemini) because we do not want to have information leaks, we can use our local models without any problem. We could connect indistinctly any of the models without having to change the workflow.
For the model to be able to choose between the options obtained in the previous step, we are going to tell it through the prompt, how we expect it to behave and what we expect from it. Something like:
You are part of the editorial team of a technology and business company, your job is to choose interesting topics to post on LinkedIn.
Some of the posts are also posted in company's webpage. It is important that the entries are well positioned at SEO level.
You are provided with a list of keywords that have been the most searched for in Google during the last week.
Your job is to choose what you think would be the most relevant blog post with the best SEO results.
Keywords have two attributes:
1. query: this attribute marks the search query that users have performed and that is trending.
2. extracted_value: this attribute marks the percentage increase that the keyword has experienced compared to previous periods.
You should choose one taking into account both the keyword's relevance to the company's SEO efforts and the comparative trend determined by the “value” attribute.
Write the keyword you have decided to post about without reasoning. Just write the word. Don't explain your reasoning
For this case:


Keyword 1:
{{ $('5 Most Trending').item.json['top5']['#1'].toJsonString() }}

Keyword 2:
{{ $('5 Most Trending').item.json['top5']['#2'].toJsonString() }}

Keyword 3:
{{ $('5 Most Trending').item.json['top5']['#3'].toJsonString() }}

Keyword 4:
{{ $('5 Most Trending').item.json['top5']['#4'].toJsonString() }}

Keyword 5:
{{ $('5 Most Trending').item.json['top5']['#5'].toJsonString() }}
This will provide us with the input that best fits the profile of our prompt, depending on the model. Each model can act differently.
Once we have the topic to create the post, we ask in this case Grok to write us about it. Another way to call LLMs.
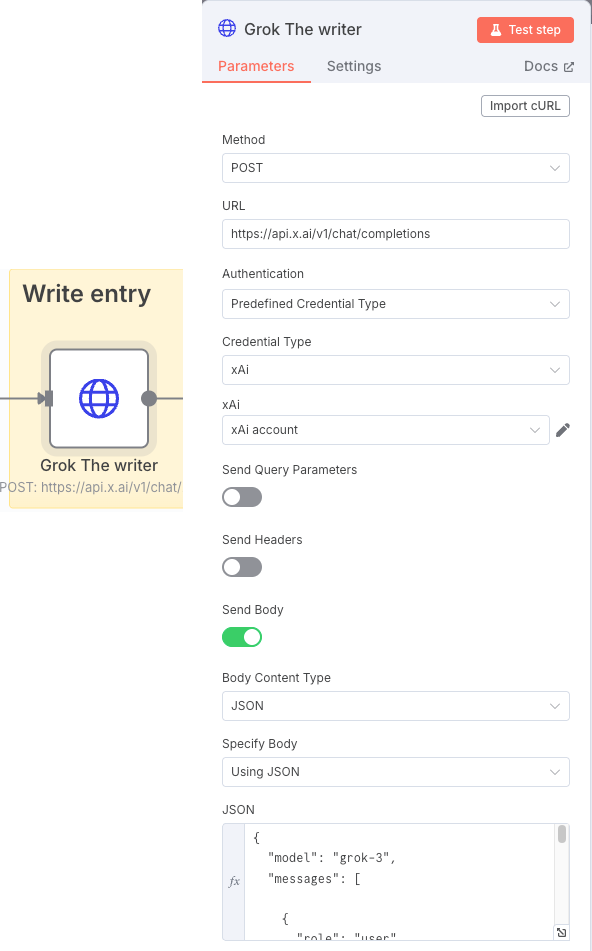
Again, we will take advantage of the prompt to indicate how we want it to behave during the writing of the post. By means of the “role” entries we will indicate the user’s request (user) and how the system should treat it at the level of context and restrictions of the conversation. We indicate this together with the model in the JSON section:
{
  "model": "grok-3",
  "messages": [

    {
      "role": "user",
      "content": "You are a business and technology insider and expert copywriter in a blog editor development team about technology and business. Generate exactly one LinkedIn post that is easy to read for humans and adheres to LinkedIn's API formatting guidelines. Follow these rules:\n\nStructure:\n1. Hook: Start with a bold opening line using Unicode characters (e.g., \"𝐁𝐎𝐋𝐃 𝐒𝐓𝐀𝐓𝐄𝐌𝐄𝐍𝐓\").\n2. Body: Use short paragraphs (1-3 sentences) separated by \\n\\n.\n3. Use bullet points (•) for key features or highlights.\n4. End with a clear call-to-action (e.g., \"Comment below with your thoughts!\").\n\nFormatting Requirements:\n- Remove all numeric citation brackets like [2], [3], [4] from the text.\n- Instead of citation brackets, if needed, add a brief phrase like \"according to Google I/O 2025\" or \"as reported by DeepMind\" naturally within the sentence.\n- No Markdown or rich text formatting.\n- Use Unicode characters or emojis for emphasis (e.g., ★, 🚀).\n- Include up to 3 relevant hashtags at the end (e.g., #AI #Automation).\n- Add URLs or references, for them use placeholders like [Link] instead of raw URLs.\n- If mentioning users or companies, use official LinkedIn URN format (e.g., \"urn:li:organization:123456\").\n\nContent Rules:\n- Max 1,200 characters.\n- Avoid promotional language.\n- Include one statistical claim or industry insight.\n- Add one personal anecdote or professional observation.\n\nReturn the post as plain text without additional commentary.\n\nInput: {{ $json.output.trim() }}"
    },
    {
      "role": "system",
      "content": "Act as a skilled editor revising AI-generated text to make it sound authentically human. Follow these rules:\n\n1. Punctuation Adjustments\n - Limit digressions in parentheses; integrate explanations into the main sentence. Language.\n   - Eliminate ellipses in the middle of sentences, unless they mimic a deliberate hesitation.\n   - Replace long dashes, semicolons, or rephrase sentences when nccessary.\n   - Avoid semicolons in informal contexts; use periods or conjunctions (e.g., 'and,' 'but').\n     \n2. Language\n   - Replace hedging phrases with direct statements.\n   - Avoid stock transitions.\n   - Vary repetitive terms.\n   - Use contractions in informal contexts.\n   - Replace overly formal words with simpler alternatives.\n\n3. Style\n   - Prioritize concise, varied sentence lengths.\n   - Allow minor imperfections.\n   - Maintain the core message but adjust tone to match the audience."
    }
  ]
}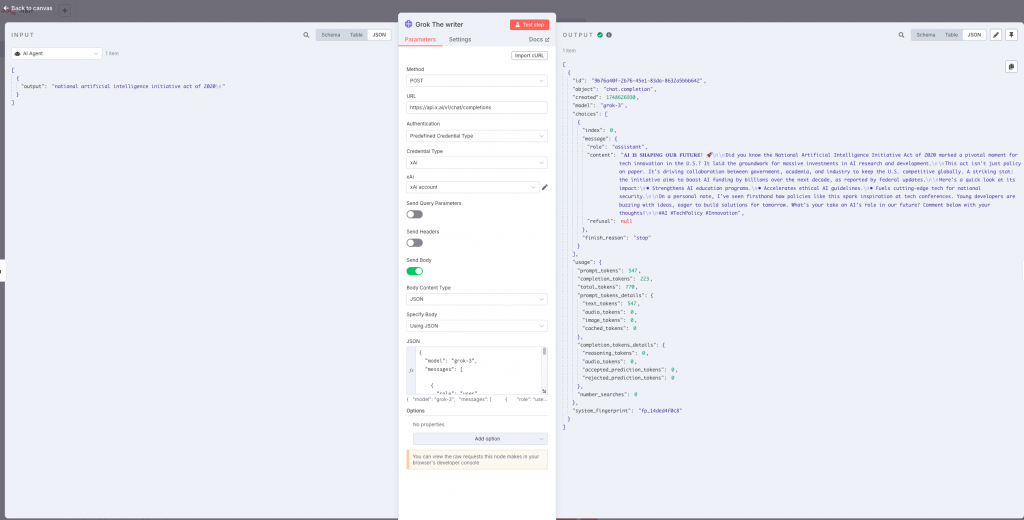
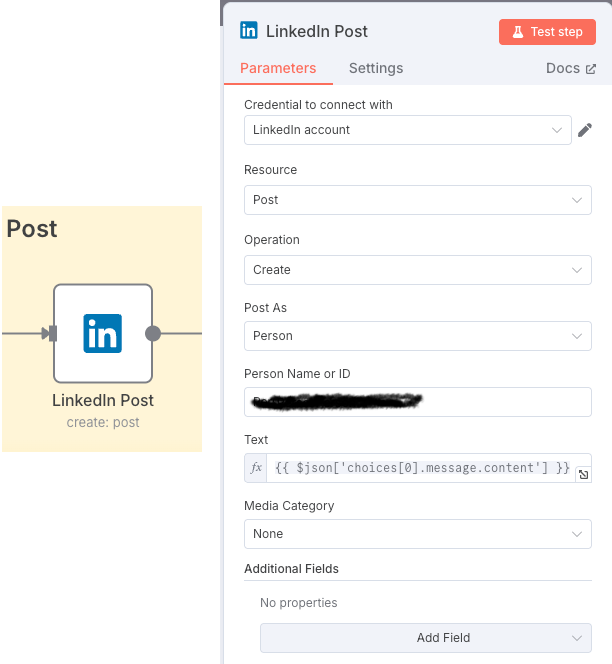
We extract the content of Grok’s response and create the post on LinkedIn with it.
The overall process would be as follows:
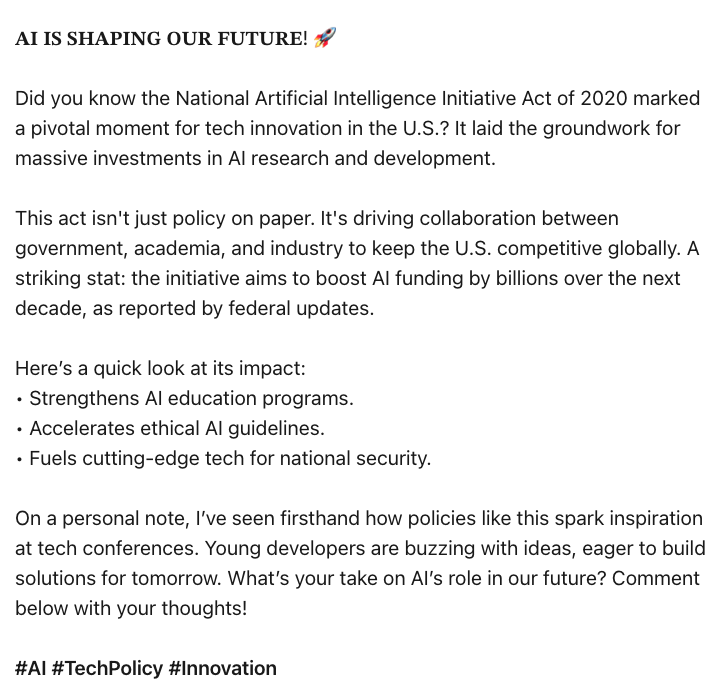
Now every time a request is received that triggers the workflow, we would get a post on a hot topic. When writing the text, it would be something like:
This workflow shows in an informative way how we could create these posts automatically, of course it could be dangerous to publish something without reviewing it beforehand. n8n offers steps where human intervention can be added, for example before making the post, we can send an email or a telegram conversation with the content and ask for approval and in case of not getting it, generate a new post.
This is a simple example, but the automation of tasks through workflows that are also supported by AI means that only imagination is the limit to the use cases. In the meantime, we can take ideas from the catalog of more than 2000 examples that the community makes available to us.
Here you can download the example. Just copy the code and paste it directly on the n8n working canvas.
2 thoughts on “Automation with AI”